Nerva GUI Guide
The Nerva GUI is NervaOne, an open source, non-custodial wallet and CPU miner for Windows, Linux, macOS and Android. It is a multi-coin application that currently speaks Nerva, Bitcoin, Monero, Litecoin, Dash and Wownero, with the Nerva side being the deepest one: full node control and mining are built in. Your keys never leave the device, and the whole thing is MIT licensed and developed in the open.
This guide walks through NervaOne as a Nerva user. Since the same application serves several coins, some screens adapt to the coin in use, and everything below assumes Nerva is selected.
Screenshots
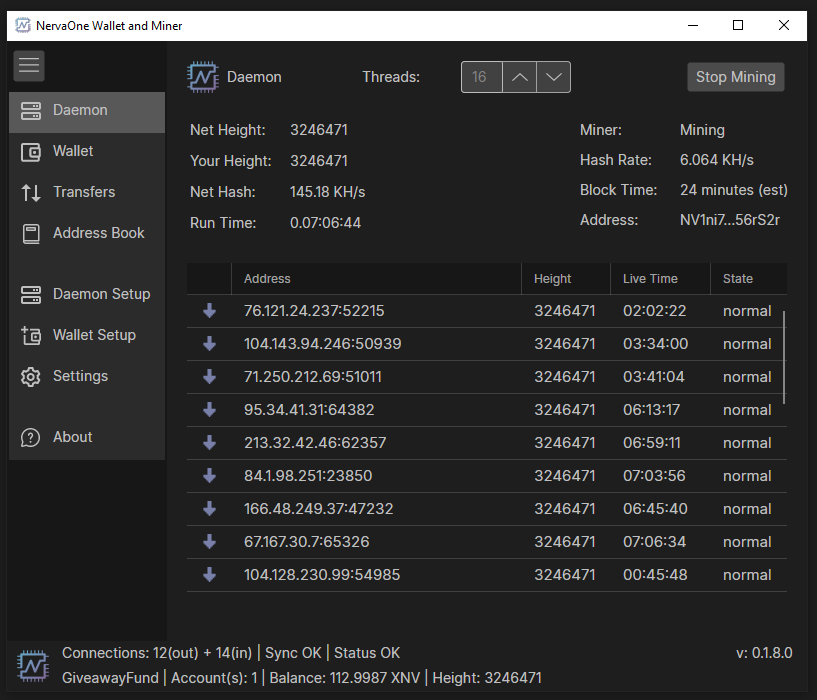
Daemon view on Desktop. You control mining from here:
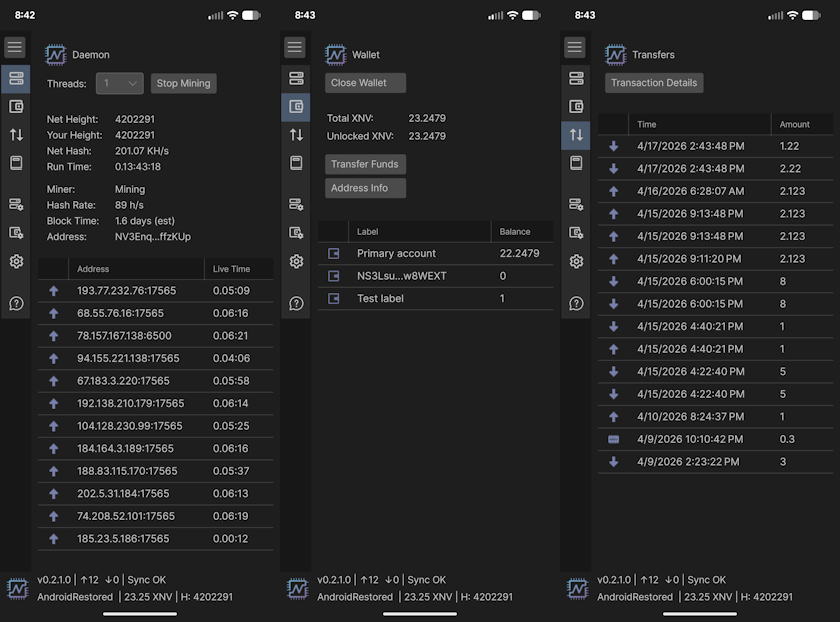
Daemon, Wallet and Transfers views on Android:
Downloading and installing
Binary distributions can be found here. Select the appropriate file for the target platform (Windows, Linux, macOS, or Android).
On desktop there is nothing to install: download the zip, extract it and run the application. On Android, download the APK and install it on your device, allowing installation from unknown sources in your Android settings if prompted.
If you prefer to build it yourself, the application is a .NET/Avalonia project and the repository README carries build instructions for desktop and Android, including publishing single-file binaries.
First run
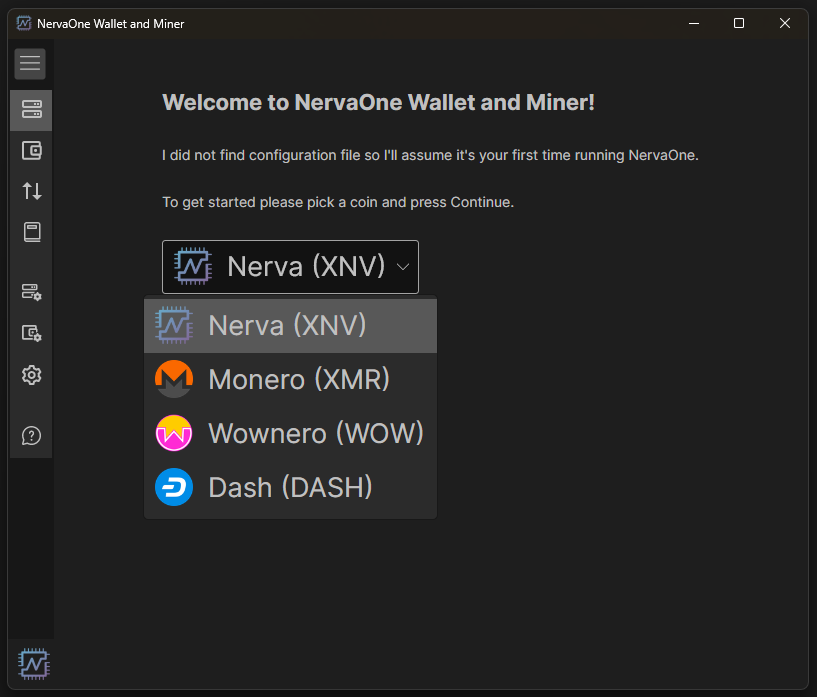
The first time you start NervaOne, it asks which coin to work with. Select Nerva (XNV) and press OK:
Then choose how to run: Full Node, Pruned Node, or Wallet Only.
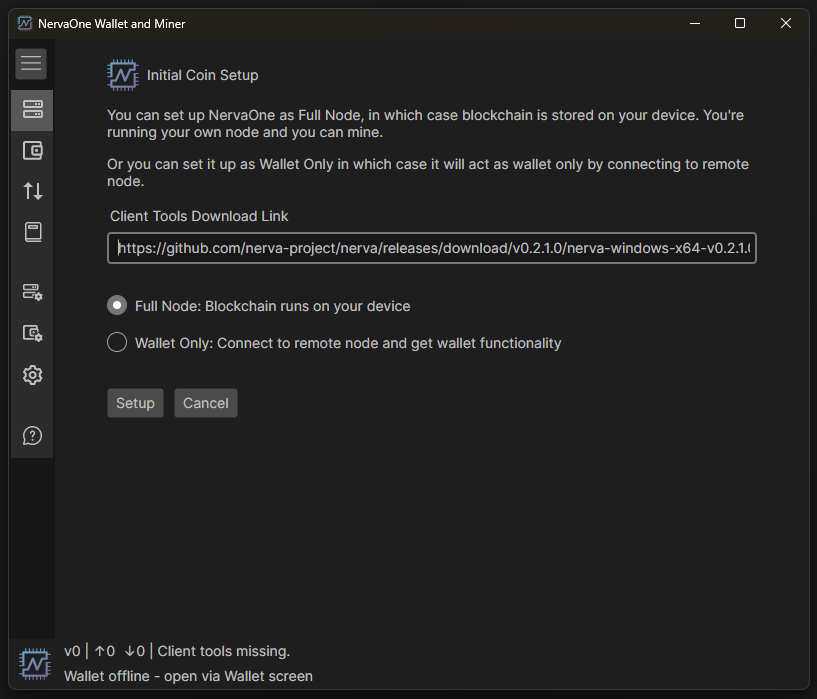
A full node downloads and verifies the whole blockchain on your device and is the trustless way to run: you check everything yourself, and you can mine. A pruned node does the same work but throws away old data as it goes, keeping the disk footprint small while still verifying new blocks, which suits laptops and phones. Wallet Only skips the blockchain entirely and talks to a remote node: convenient and light, but you are trusting someone else's node to tell you the truth about the chain. You can switch between modes at any time under Daemon Setup.
If you choose to run a node, NervaOne offers to download the client tools (the nervad daemon and wallet programs) for you, and can restart the daemon with QuickSync to bootstrap the blockchain quickly instead of syncing from zero.
The Daemon view
The Daemon view is the control room for your node. The top shows the state of the chain and the network: your height against the network height, the net hash rate, the block time, and how long the daemon has been running. The connections list below names each peer you are talking to, the height it is at, how long you have known it, and its state.
The mining controls live here too. Start Mining and Stop Mining turn the miner on and off, and the panel reports your hash rate and the mining address currently receiving rewards. The threads count is how many CPU threads the miner uses, and is set in Daemon Setup.
Daemon Setup
Daemon Setup configures everything about how the node runs, and its options deserve a quick tour. The data directory and port number are where the blockchain lives and which port the daemon listens on; the defaults are fine unless you are running several nodes. The log level sets how chatty the log files get.
Mining options start with the mining address that receives rewards, auto start mining if you want the miner up whenever the daemon is, and the net hash threshold, which pauses mining while the network hash rate is above a value you set, useful if you only want to mine when difficulty is friendly. Pin mining threads to CPU cores keeps the hashrate stable while you use the computer for other things; it is on by default on desktop.
The mode section switches between Full Node, Pruned Node with a configurable prune size, and Wallet Only with the remote node address to connect to. For pruned nodes, the prune size is the disk budget the blockchain is allowed to occupy. Below that, Public Node Setup configures your node so other wallets, including your own NervaOne on Android, can connect to it from outside your network.
The remaining switches cover behavior: disable analytics stops the node from reporting to the node map, disable DNS stops the daemon from resolving seed nodes and other DNS based records, the connections guard protects against peer flooding, and stop daemon on exit shuts the node down with the application instead of leaving it running. Additional startup arguments are passed to nervad verbatim, for anything not covered by a checkbox.
The buttons at the bottom handle the lifecycle: Restart with QuickSync re-bootstraps the chain, Restart with Optional Command restarts with your extra arguments applied, Download Blockchain Db fetches a chain snapshot, and Update Client Tools and Open Client Tools Folder manage the bundled daemon and wallet programs.
Mining
Nerva is mineable with a regular CPU, and NervaOne is a complete mining setup on its own: it runs the daemon, starts and stops the miner, and collects the rewards to your wallet. There is no pool, no account and no separate miner program involved.
To mine, set a mining address under Daemon Setup, choose a thread count your machine is comfortable with, and press Start Mining in the Daemon view. The mining address is where block rewards go, so double check it: it can be any Nerva address, including one from another wallet, but a typo means rewards go nowhere recoverable. The hash rate readout tells you how fast you are mining, and your earnings arrive as unlocked balance in the wallet after the usual confirmation period.
Two settings are worth knowing before you leave a miner running for days. The net hash threshold pauses mining when the network hash rate is above your chosen value, so you only mine when your odds are decent. Thread affinity, the "pin mining threads to CPU cores" option, keeps each mining thread on a physical core instead of bouncing between them, which stops the hashrate from sagging while you use the computer. On Android the miner respects battery realities and the option is off by default.
A wallet is not required to mine, but without one you have nowhere sensible to send rewards, so in practice you create a wallet first, then mine to its address. Mining works the same on all platforms, with the caveat that phones and laptops throttle under sustained load, and a device that thermal throttles mines slower and less efficiently than its peak numbers suggest.
The Wallet view
The Wallet view shows your accounts: the address, its label, the balance and the unlocked balance for each. Unlocked balance is what you can spend right now; the rest is incoming funds waiting for their confirmations, which takes a few minutes on Nerva.
The buttons above the list cover the everyday wallet work. Transfer Funds opens the send screen, described below. Start Mining is a shortcut that starts the miner with this account's address as the mining address. Create New Account adds another account under the same seed, each with its own address, which is handy for keeping things separated without managing multiple seeds. Rename Label names an account so you remember what it is for. Address Info shows the full details of an account, including its subaddresses. Export All and Export Selected produce files of your transaction history.
Wallet Setup
Wallet Setup is where wallets are created and maintained. Create New Wallet makes a fresh wallet with a new seed. Restore Wallet from Seed brings a wallet back from its 25 word mnemonic, and Restore Wallet from Keys does the same from the raw keys; both ask for a restore height or date, and giving the approximate one from when the wallet was first used makes the rescan much faster. Restore Wallet from Dump File loads a wallet from a keys dump produced elsewhere, and Dump Keys to File writes one.
View Keys and Mnemonic Seed shows the keys and the seed of the open wallet, and is covered with warnings below. Rescan Blockchain walks the chain again looking for your outputs, for when something looks off after a fork or an import. Rescan Spent re-checks which of your outputs are spent. Run Sweep Below On Wallet sends every output worth less than an amount you choose to another address, which is a way of consolidating dust into something spendable.
Wallet Unlock Minutes sets how long the wallet stays unlocked after you type your password before asking again, and the log level sets the wallet log verbosity. Open Wallets Folder and Open Wallet Exports Folder open the directories where wallets and exported files live, which is also how you get to them for backups.
Transferring funds
Go to Wallet > Transfer Funds, fill in the recipient wallet address and the amount to send, and press Transfer. The payment id field is optional and can be left empty for ordinary transfers to regular addresses. The fee is calculated and shown before you confirm, along with the total being sent, so what you see is what pays:
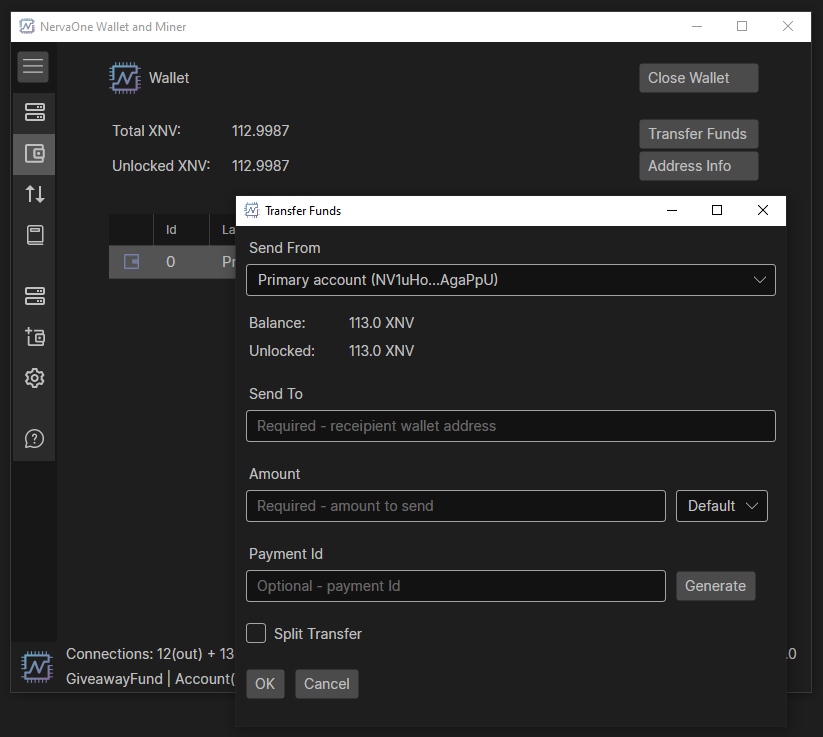
Enter your password if asked and press OK. Your transaction should now be on the way to the recipient's wallet!
The Transfers view lists everything that has happened: incoming and outgoing amounts, the time, the height, confirmations, and the address on the other side. Transaction Details opens the full record for a transfer, and Export All writes your history to a file. Pending transactions show up at the top while they wait for confirmation.
The address book
The Address Book stores the addresses you send to repeatedly, with a name, a description and an optional payment id. From an entry you can transfer directly or edit the details. It is a small thing, but it removes the copy-paste-a-wrong-address class of mistake from your life, and entries sync with nothing and nobody: they live on your device.
Exporting keys
Each NERVA wallet is, essentially, just a string of 25 words from which the public address is derived.
It is very important to export these keys and back them up somewhere that is safe and secure (meaning somewhere reliable/permanent that no one else can access).
In the event of a lost or corrupted wallet file, computer crash, etc., the 25 word mnemonic seed and Private Spend Key are the only way to restore a wallet and recover the funds it holds.
DO NOT SHARE IT WITH ANYONE. Anyone who has these can access your funds and has complete control over your wallet.
In NervaOne, go to Wallet Setup > View Keys and Mnemonic Seed. Wallet public and private keys as well as the 25 word mnemonic seed will be displayed.
Safely save and store these words and keys
Moving a wallet to another device
If you'd like to move your wallet to another device, you can just copy wallet files.
Go to Wallet Setup and click "Open Wallets Folder". Copy the wallet that you want to move and paste it to the same folder on another device.
Make sure you copy both .cache and .keys files or your wallet might not open properly.
The other way to move a wallet is the seed itself: create a new wallet on the target device, choosing restore from seed, and the funds follow. That path needs nothing but the 25 words and a restore height, which is also why the words deserve the safe place you gave them.
Running a public node
Running a public node allows other users, or your own instance of NervaOne on Android, to connect to your node in wallet-only mode. You can set it up under Daemon Setup > Public Node Setup. The screen shows the node address to share and can detect your external IP address for you.
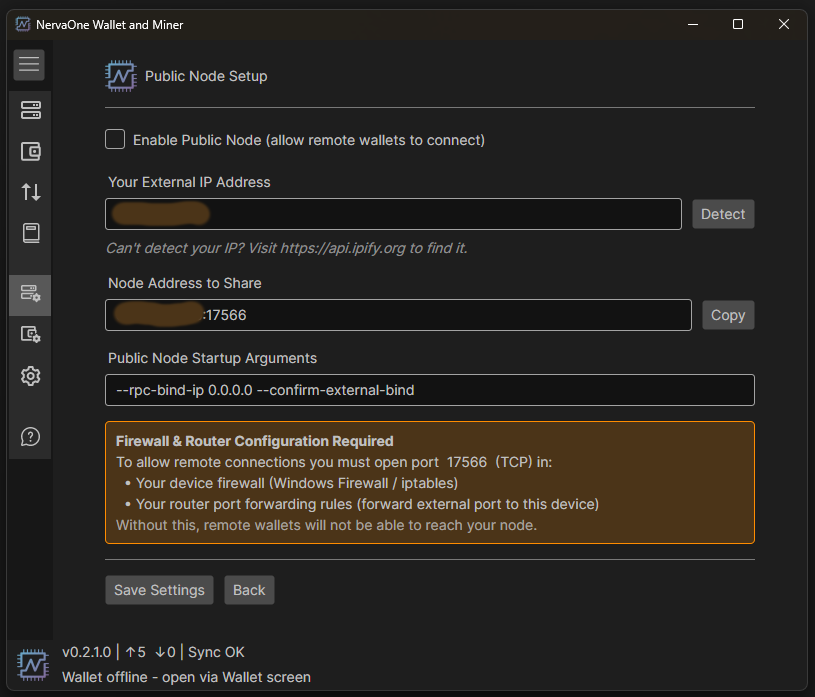
After you're done, two additional things are required: opening the port in your firewall, and setting up port forwarding on your router.
Step 1 — Firewall
Open port 17566 as an inbound rule in your system firewall. On Windows this is done through Windows Firewall; on Linux via ufw or iptables; on macOS through System Settings > Network. Without this, your node will not accept incoming connections even if port forwarding is configured.
Step 2 — Find your internal IP
Find your internal IPv4 address — run ipconfig on Windows, or ip addr / ifconfig on Linux and macOS. You'll need this for the port forwarding rule.
Step 3 — Router port forwarding
Log in to your router and add a port forwarding rule for port 17566 pointing to your internal IP address. Note that some ISPs (such as Xfinity/Comcast) do not expose port forwarding in the router admin interface — you may need to set it up through your ISP's app instead.
Once both steps are done, your node will be reachable from outside your network, and wallets can connect to it by the address shown in the setup screen.
Settings and About
The Settings view holds the application-wide options, and About names the version and points to the project. If something misbehaves, the version number is the first thing a supporter will ask for, and updating is a matter of downloading the new release and running it, with wallets and node data staying in place.
Troubleshooting
libhidapi library missing in macOS
If your nervad does not start on macOS because you get an error similar to this:
dyld(9313): Library not loaded: '/usr/local/opt/hidapi/lib/libhidapi.0.dylib' Referenced from: '....nervad' Reason: tried '....libhidapi.0.dylib' (no such file)
Try the fix from here. Those should be the commands that you need to run:
brew update
brew reinstall hidapi
If you do not have homebrew, you'll need to install it from here.
The daemon will not start
Check the client tools under Daemon Setup: Update Client Tools replaces a broken or outdated daemon download, and Open Client Tools Folder lets you look at what is actually there. If you point NervaOne at a remote node instead, in Wallet Only mode, the local daemon is not started at all, which is also the quickest way to check whether a problem is with your node or with the application.
- Last updated:
-
Contributors

